
Heat Press Temperature Guide Vinyl Yoiki Guide
Setting Temperature How to set temperature time pressure for heat press machine? It's like setting the time. The only difference is that the dial has a Celsius or Fahrenheit sign. It's almost like using a microwave or oven. Heat Press Time and Temperature Guide The quality and clarity of the transfer depends on some factors.

Pin on ScanNcut
Achieving the optimal temperature is vital for obtaining vibrant, durable, and professional-looking results in heat pressing applications. The correct temperature ensures that the materials being pressed, such as transfer paper or vinyl, reach the required level of heat for effective bonding with the substrate.

Free Vinyl Craft Resources Sizing Chart, Heat Settings & More
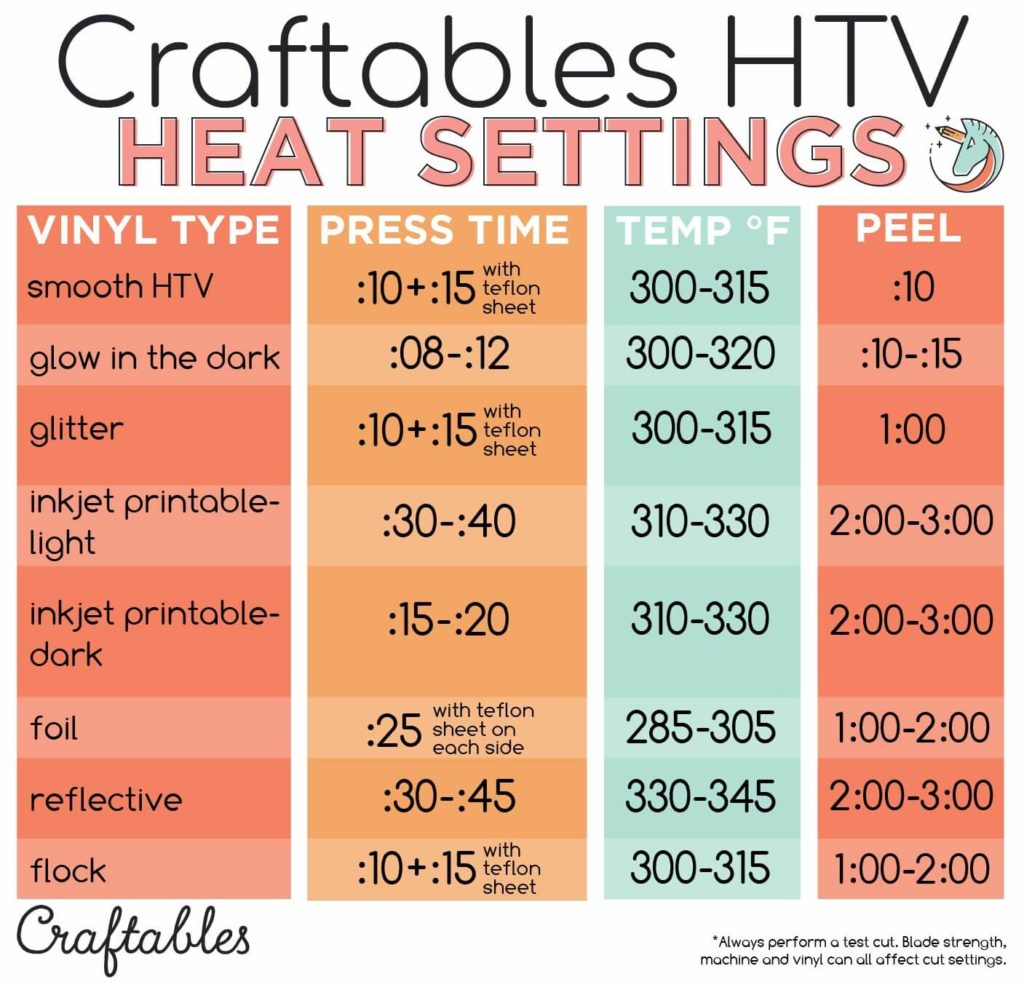
305°-315° F. 10-15 seconds. cold peel. Embossed. 305°-310° F. 10 seconds. cold peel. These heat transfer vinyl settings are for the Cricut heat presses, but there are some other heat presses that work for making projects with this material. Consecuently, use this summary table with the settings as a guide, because remember that each heat.

Heat Transfer Vinyl Guide Heat Transfer Vinyl Temperature Guide
Each type of heat transfer vinyl requires slightly different time and temperature heat press (and iron on) times, peel temperatures, and garment care for the best results. How's a girl (even this girl) to (quickly) know what time and temp to use on each one?

heat press time temperature chart everything you should high quality
HEAT TRANSFER VINYL.. HEAT APPLICATION SETTINGS: Temperature: 305°F/150°C Pressure: Medium; Press Time: 10-15 seconds *Preheat all fabric prior to pressing for best results!*. Every type of Heat Transfer Vinyl has its own recommended press time, temperature, and pressure settings (see above 'Heat Application Settings"), but make sure to.

Heat Press Temperature Guide
Metallic Finish: 320°F Multi-Purpose Material: 350°F Glitters: 350°F High-Quality Digital Prints: 305°F Glow in the Dark Fabrics: 350°F Stubborn Fabrics: 330°F Photo Transfer on Light Fabrics: 385°F Photo Transfer on Dark Fabrics: 356°F So as you can easily see, there is a range of temperatures you can use on your machine.
Printable Sublimation Color Chart
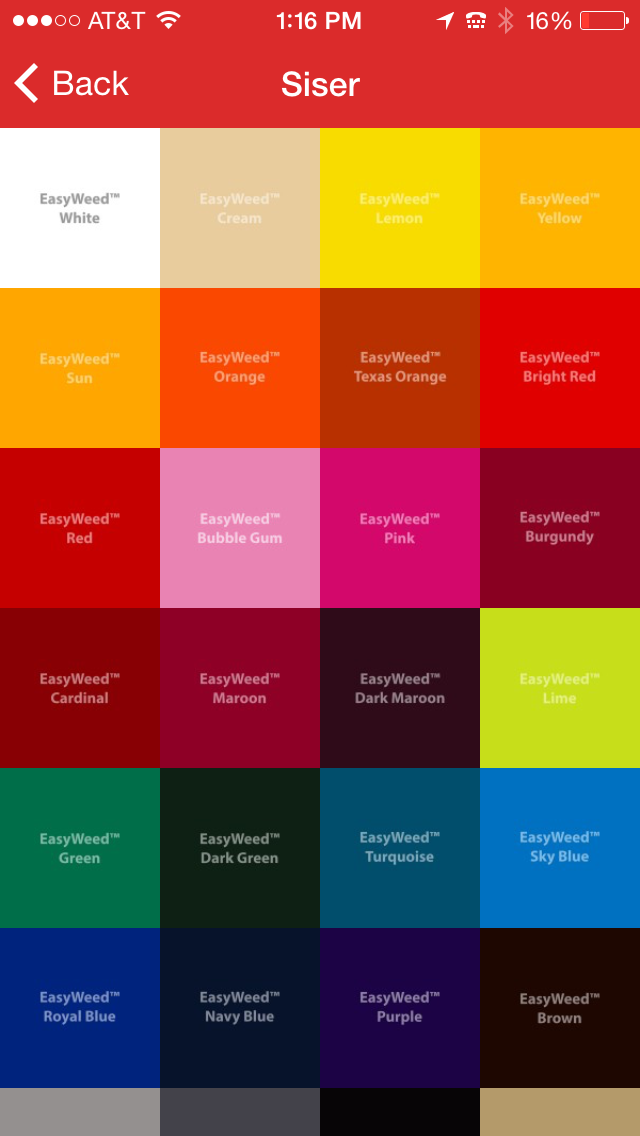
Updated: Nov. 2, 2023. We have created at-a-glance time and temperature charts for Siser heat transfer vinyl (HTV) used with either a conventional heat press or a Cricut EasyPress.There is a chart for each heat press type available for download. Our single-page full-color printable charts include all current varieties of HTV produced by Siser North America. Our charts provide time, temperature.

heat press temperature chart cricut best picture of chart
Monday, November 14, 2022 If you're like me and you have trouble remembering temperature and time for HTV vinyl, I have just the craft hack for you! You can download these free printable HTV time and temperature cheat sheets from So Fontsy for easy reference so you're never left searching for the right time and temp again!

[Infographic] Heat Press Temperature Chart for HTV Snip to It
Setting the time The timer is usually set in much the same way as the temperature. This too can be set exactly, and if you get the right sort of heat press, it will turn off or open the lid when the time has elapsed. Others will make a noise to let you know that your transfer is now ready. Time and temperature guide

Heat Press Temperature Chart [The Ultimate Guide] AkoTaq
$11.99 Add To Cart Glitter Glow in the Dark Heat Transfer Vinyl $14.99 Add To Cart Remember that heat transfer product come in different patterns and textures. Some are thicker, some are thinner, that's why their heat/temperature and time settings differ. Pin this cheat sheet, print it out, and place it somewhere in your work area.

Heat Transfer Vinyl Temperature and Time Settings (at Your Fingertips
• Cover design with Heat Transfer Cover Sheet or Multipurpose Paper. • Place on flat, hard surface (ironing board not recommended). • Press iron with medium/firm pressure for 10-15 seconds. • Peel carrier hot or cold. Application Instructions (Heat Press): • Preheat garment for 2-3 seconds. • Apply design at 305°F / 150°C
Heat Transfer Vinyl Temperature and Time Settings (at Your Fingertips
Setting Temperature How to set temperature time pressure for heat press machine? It's like setting the time. The only difference is that the dial has a Celsius or Fahrenheit sign. It's almost like using a microwave or oven. The quality and clarity of the transfer depends on some factors. These factors are time, pressure and temperature.

Printable Heat Press Temperature Guide
The ideals temperature for heat transfer vinyl belongs in 260°F for 315°F (130°C to 160°C), using moderate pressure. It is very important to read the product description of the heat-pressed product before deed any work.. The best time to pressed heat transfer vinyl with medium pressure has 8 to 15 seconds. Majority heat presses have an.

Heat Transfer Vinyl Temperature and Time Settings (at Your Fingertips
Weed the excess material. After everything has been set up, apply the glitter vinyl to the apparel with medium pressure, using a heat range between 300 and 320 degrees for 15 to 20 seconds. After the carrier paper has been peeled, wash the transfer after 24 hours.
Problems Getting Heat Transfer Vinyl To Adhere? Try These Tricks
What temperature do I use for heat transfer vinyl? Material-Specific Settings: Different materials necessitate distinct settings.Basic Cotton Fabric, aim for 305°F(151°C) for 10-15 seconds. Sublimated polyester needs just 270°F(132°C) for 15 seconds, stretch materials require 305°F (151°C) and a pressing time of 15 seconds, and glitter vinyl is best at 320°F (160°C) and a pressing time.

Pin by Noemi Virostek on Cricut Cricut heat transfer vinyl
What is HTV, and how do I determine the correct time and temperature for it? HTV stands for heat transfer vinyl or iron-on. The time and temperature for HTV can vary by brand and the material you're pressing it onto. It's best to check the manufacturer's website or product listing for specific instructions.
